Looking for high-quality 2×72 belt grinder plans so you can build your own? You’ve come to the right place. A 2×72 belt grinder is an essential tool for any serious metalworker, knife maker, or DIY enthusiast. It allows you to grind, shape, and polish metal with precision and efficiency. While commercial options are available, building your own 2×72 belt grinder from plans offers a unique set of advantages, including cost savings, customization, and the satisfaction of creating something with your own hands.
Why You Need a 2×72 Belt Grinder
A 2×72 belt grinder might seem like a specialized tool, but its versatility makes it invaluable for a wide range of tasks:
- Knife Making: Shaping and sharpening blades
- Metal Fabrication: Smoothing welds, removing rust, and shaping metal parts
- Woodworking: Shaping and sanding wood (with the right belt)
- Sharpening: Honing tools, knives, and even lawnmower blades
Benefits of Building Your Own Belt Grinder
While you can purchase pre-built belt grinders, constructing one yourself offers numerous benefits:
- Cost-Effectiveness: Building your own grinder is often significantly cheaper than buying a pre-made unit, especially if you’re looking for higher-end features.
- Customization: You have complete control over the design, size, and features of your grinder, allowing you to tailor it perfectly to your needs and workspace.
- Durability: When you choose the materials and construction methods, you can build a grinder that’s as robust as you need it to be.
- Learning Experience: The process of building a belt grinder is incredibly rewarding. You’ll gain valuable skills in metalworking, welding, and mechanics.
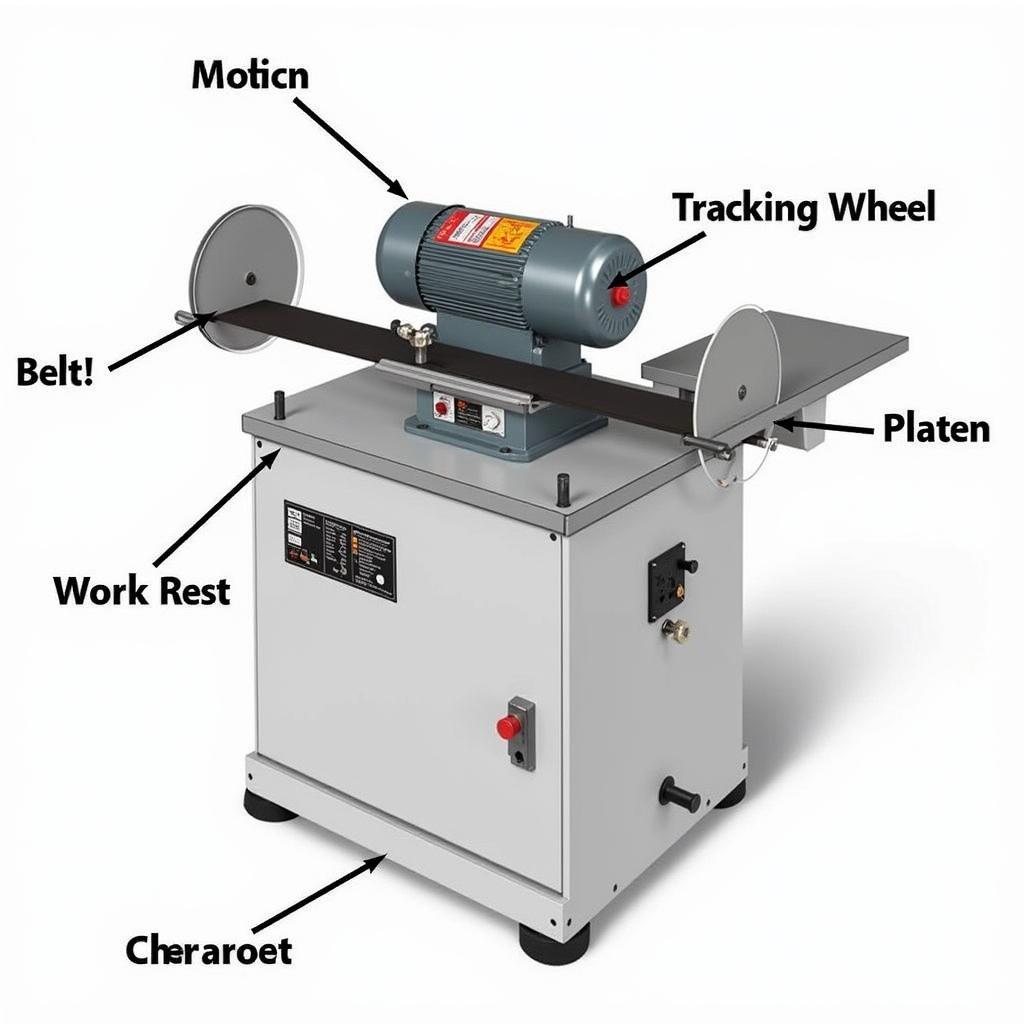 Essential Components of a 2×72 Belt Grinder
Finding Free 2×72 Belt Grinder Plans (PDF)
Free 2×72 belt grinder plans are readily available online, allowing you to embark on this rewarding project without breaking the bank. Here’s where to look:
- DIY Forums and Communities: Websites and forums dedicated to metalworking, knife making, and DIY projects are treasure troves of shared knowledge and resources. Look for threads or sections specifically related to belt grinders.
- Online Project Sharing Platforms: Platforms like Instructables, Make:, and Hackaday often host detailed project guides, including belt grinder builds.
- Video Platforms: YouTube is an excellent resource for finding visual guides and tutorials. Search for “2×72 belt grinder build” or “DIY belt grinder plans” to find detailed video instructions.
Essential Features to Look for in Plans
Not all 2×72 belt grinder plans are created equal. When selecting a set of plans, consider the following factors:
- Level of Detail: Choose plans that provide clear, step-by-step instructions, detailed diagrams, and a comprehensive list of materials.
- Material Availability: Opt for plans that utilize readily available materials and components to simplify sourcing.
- Skill Level: Assess your own welding and fabrication skills before choosing a plan. Some designs are simpler than others.
- Motor Specifications: Make sure the plans specify a motor that aligns with your power requirements and access to single-phase or three-phase power.
Key Components of a 2×72 Belt Grinder
Before diving into construction, familiarize yourself with the primary components of a 2×72 belt grinder:
- Motor: The powerhouse of your grinder. Common choices include AC induction motors.
- Drive Wheel: This wheel transfers power from the motor to the belt.
- Tracking Wheel: Located opposite the drive wheel, it helps to keep the belt aligned.
- Belt: The abrasive belt is responsible for grinding and shaping material.
- Platen: A flat surface positioned behind the belt provides support for workpieces.
- Work Rest: An adjustable platform that provides stability while grinding.
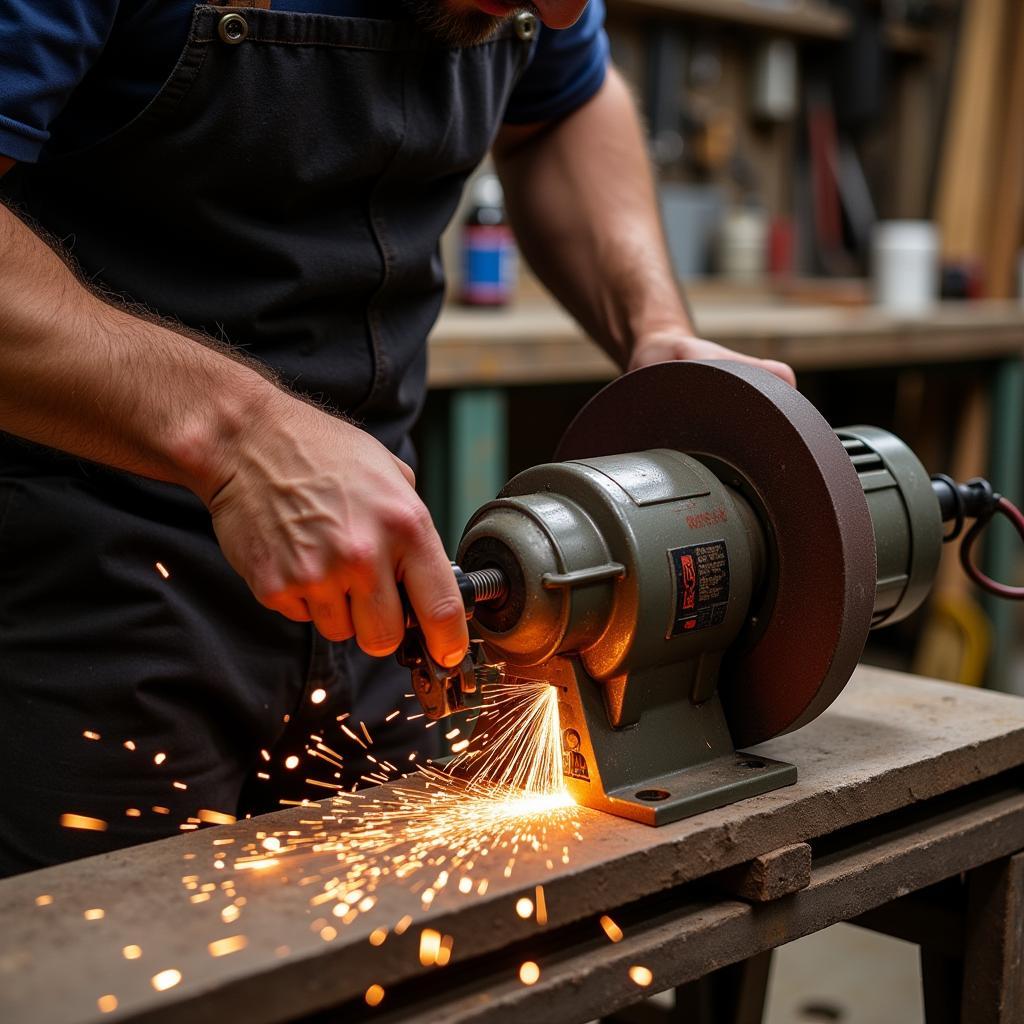 Using a 2×72 Belt Grinder for Metal Shaping
Building Your Belt Grinder: Step-by-Step
Once you’ve acquired your plans and gathered the necessary materials, you can begin the construction process:
- Cut and Prepare Materials: Use a saw (like a metal chop saw or angle grinder with a cut-off wheel) to cut the metal stock (usually steel) according to your plans.
- Fabricate the Frame: Weld the frame components together, ensuring it is square, level, and sturdy.
- Mount the Motor and Drive System: Attach the motor securely to the frame and install the drive wheel, bearings, and belt tensioning mechanism.
- Install the Tracking Wheel: Mount the tracking wheel and ensure it is aligned with the drive wheel.
- Fabricate or Purchase a Platen: Create a flat, durable platen or purchase a pre-made one.
- Add a Work Rest: Fabricate or purchase an adjustable work rest for added support.
- Wire the Motor: Following electrical safety guidelines, connect the motor to a power source through an appropriate switch.
- Test and Adjust: Run the grinder to test belt tracking, speed, and overall functionality. Make any necessary adjustments.
Conclusion
Building a 2×72 belt grinder is an achievable and rewarding project for any DIY enthusiast or metalworker. By finding free PDF plans online and following the steps outlined above, you can create a powerful and versatile tool that will elevate your workshop capabilities. Remember to prioritize safety throughout the build process, and enjoy the satisfaction of using a tool you crafted yourself!